

How to Join Tables in SE16H: A Step-by-Step Guide
- Abdullah Galal
- Nov 24, 2025
- 4 min read

By Abdullah Galal | Galal Consulting
In our introduction to SE16H, we unveiled its ability to join tables—a feature that fundamentally changes how you can explore data without writing a single line of ABAP. But how does it work in practice?
Today, we move from concept to action. I will guide you step-by-step through creating an Outer Join Definition in SE16H to solve a common business need: displaying a complete view of General Ledger master data by linking three tables in a single report.
This is where SE16H transitions from a handy tool to a central part of your analytical arsenal.
The Business Case: Unified GL Account Master Data
A GL account's master data is maintained on two levels:
Chart of Accounts Level (Table SKA1): Contains details like the account group and the GL account type.
Company Code Level (Table SKB1): Contains details like the tax category and account control.
The link between them? The Company Code Assignment (Table T001), which defines which chart of accounts a company code uses.
Our goal is to join SKB1, T001, and SKA1 to see all this information in one place.
Step-by-Step: Building the Outer Join Definition
Step 1: Launch SE16H and Start the Definition
Go to transaction SE16H.
Enter your primary table, SKB1 (the company code-level data).
Click on the icon next to the Outer Join Definition field.
Enter a name for your join, e.g., Z_FULL_GL, and a description. Click Create.
You will now see the Outer Join maintenance screen.
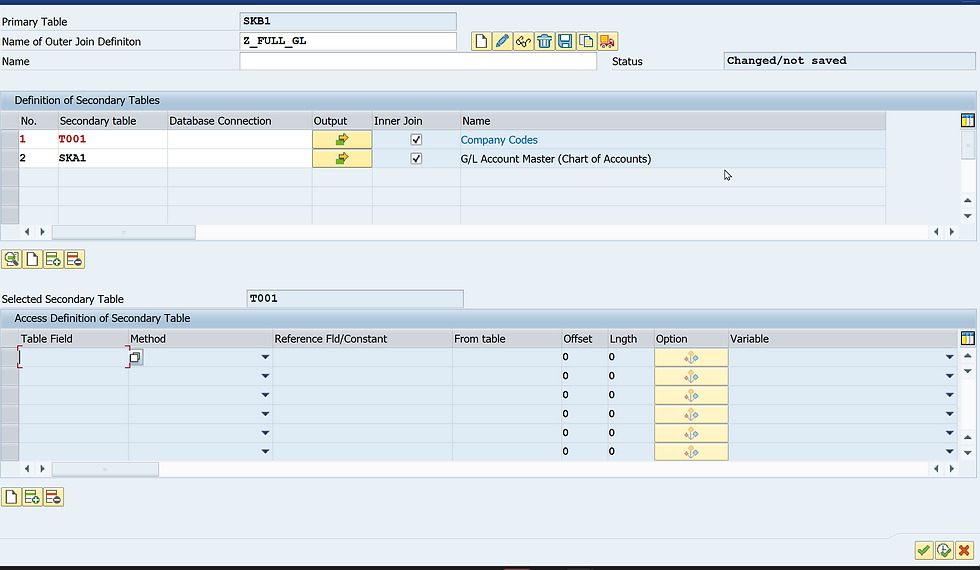
Step 2: Add the Secondary Tables
We need to add our two linking tables. The sequence is critical.
In the Secondary Table column, enter T001 (the company code table).
Click the Output checkbox. This ensures fields from T001 will be displayed. Let's select BUKRS (Company Code) and KTOPL (Chart of Accounts).
Set the Join Type to Inner Join. This is crucial. An Inner Join means we only want records that exist in both tables. We only want GL accounts that are actually created for a company code, not every possible account in the chart of accounts.
In the No. column, enter 1 to define this as the first join.
Now, add the second table:
Click the + icon to add a new line.
Enter SKA1 (the chart of accounts-level data).
Check the Output box and select the fields you want, like the account group (KTOKS).
Set the Join Type to Inner Join.
In the No. column, enter 2. This ensures T001 is joined first, providing the necessary chart of accounts to link to SKA1.
Your screen should look like this:
Step 3: Define the Join Conditions
Now, we must tell SAP how these tables are connected. Double-click on the first line (T001) and move to the lower part of the screen.
Click on "Create" to add new conditions. For Table T001 (No. 1):
Table Field: BUKRS (Company Code)
Method: Reference
Ref. Table: SKB1 (our primary table)
Ref. Field: BUKRS (Company Code)
This condition tells SAP: "For every company code in SKB1, find the matching company code in T001."

Now double-click on the second line for table SKA1
Click the "Create" icon to add conditions for SKA1.
For Table SKA1 (No. 2):We need two conditions here because SKB1 and SKA1 don't share a direct key.
Condition 1:
Table Field: KTOPL (Chart of Accounts)
Method: Reference
Ref. Table: T001 (the table we just joined!)
Ref. Field: KTOPL (Chart of Accounts)
This links SKA1 to T001 via the chart of accounts.
Condition 2:
Click the + icon in the condition block.
Table Field: SAKNR (GL Account Number)
Method: Reference
Ref. Table: SKB1 (our primary table)
Ref. Field: SAKNR (GL Account Number)
This links SKA1 to SKB1 via the GL account number.

Step 4: Save, Test, and Execute
Click Execute and save your Outer Join Definition as Z_FULL_GL.
Back at the SE16H main screen, your Z_FULL_GL definition will be selected. Enter a company code (e.g., AG01) and execute.
The Result: You now have a single list showing fields from SKB1, T001, and SKA1 seamlessly merged. You can see the company code details, the assigned chart of accounts, and the master data from the chart of accounts level all at once.
Pro Tip: Validate Your Join
A quick way to check if your join is working correctly is to compare the record count.
Run SE16H with your Outer Join and check the number of lines.
Run SE16H for the primary table (SKB1) alone with the same selection (e.g., company code AG01). The number of entries should be the same.
If the counts match, your Inner Join is correctly filtering for only the existing records. If they are different, double-check your join conditions and types.
Key Takeaways
Sequence Matters: Join tables in the logical order of their relationships.
Inner Join is Your Friend: For most operational reporting, you want an Inner Join to see only relevant, existing data.
Conditions are Key: accurately defining the linking fields is what makes the join work.
Test Your Work: Always validate the output against your business knowledge and record counts.
By mastering Outer Join Definitions, you eliminate the need for cumbersome multiple extracts and complex Excel VLOOKUPs. You are now pulling unified, intelligent datasets directly from your SAP system.
Ready for the next level of customization? In the next post, we'll learn how to create dynamic calculated columns using Formulas in SE16H. [Link to Blog Post 4]
Did you successfully build your first join? Having any trouble with the conditions? Share your experience or ask questions in the comments below!
For the visual learners, don't forget to watch the full video walkthrough of this process on the [SAP Data Browsers Playlist on my YouTube Channel].


Comments